I saw this cute shelf in a catalog some time ago. I especially liked the little birdhouses that hang from the pegs.
I had a hard time photographing the finished project so I took many pictures trying to get something that showed just how nice the shelf turned out.
First of all you will need scraps of mat board.
Cut a strip of mat board at least 12" long and 3/4" wide.
Cut a strip of mat board at least 4" long 3/16" wide.
Cut another strip of mat board at least 4" long and 1/8" wide.
From the 3/4" wide strip cut a piece 2 15/16" long, this is the back.
Also from the 3/4" wide strip cut 2 pieces 3 3/8" long, these are the top of the shelf.
From the 3/16" wide strip cut a piece 2 15/16" long.
From the 1/8" wide strip cut a piece 2 15/16" long.
Here are the beautiful patterns that Nancy drew for us. Copy them onto card stock.
The brackets are patterns to trace onto mat board. The birdhouse bases will be traced onto mat board, too.
Use the how-to from the "Things to do, Things to see" list at the left of the blog, HOW TO RE-SIZE THE PATTERNS.
You can use either Tacky or yellow carpenter's glue on this project.
Glue two brackets together, to make a double thickness.
Now, you have two brackets for the shelf.
On the back (2 15/16" x 3/4") mark a center and from there measure and mark lines 3/16" apart.
Use a stylus to create grooves in the mat board.
This will look like bead board when I am done.
Do you see the grooves in the surface of the mat board?
Glue the 3/16" wide strip of mat board at the top of the "bead board" and glue the 1/8" wide strip at the bottom.
Glue the brackets onto the ends of the bead board assembly.
The shelf so far.
Get the two pieces of mat board that measure 3 3/8" x 3/4", the top of the shelf.
Glue these to strips together to make double thickness.
Cut some strips of card stock about an 1/8" wide. These will cover the cut edges of the top shelf and the brackets. Usually I just cut these by eye because the width is just under an 1/8".
Start gluing your strips on.
You are using the card stock strips just like veneer.
There, the shelf is done.
I did not cover the back of the shelf, just the two short sides and the front.
Glue the card stock strips onto the edges of the brackets.
The raw cut edges of the brackets have been covered and they look nice.
Center the top shelf over the brackets, keep the backs even and glue on the top shelf.
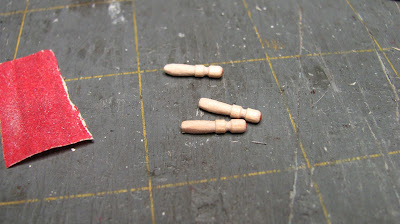
Using these toothpicks is optional, they are decorative toothpicks for fancy finger foods. I have a container of these and I thought they would make nice pegs.
You can also use the regular toothpicks, just round off the tips.
Cut three pegs and sand down the plain ends.
Drill three holes in the 1/8" wide piece of mat board.
Mark the center and drill two other holes 3/4" from the center.
Glue the pegs into the holes.
After the glue has dried I painted the shelf ivory.
Let this dry and paint again.
You can sand lightly with 220 grit sand paper and apply a final coat of paint for a smooth finish.
Copy Nancy's patterns onto card stock.
Score on the lines before you cut out the birdhouses.
Cut out the birdhouses.
I used 1/8" and 1/16" hole punches to punch the holes into the front of the birdhouses.
Fold the birdhouses and glue them together.
I have the three birdhouses, the roofs and the bases ready.
The bases are cut from mat board.
Sand a toothpick down to fit into the 1/16" hole in the front of the birdhouse.
This is the perch.
I've mixed some paint for my birdhouses. I keep my small amounts of mixed paint fresh by putting small lids over the puddle of paint. This keeps over night for me.
Glue the bodies of the birdhouses onto the mat board bases.
After the last coat of paint I have applied a finish coat that was compatible with my craft acrylic paint.
I painted my roofs grey and threaded a piece of string through the roof peak.
I've mixed a dirty wash to age my shelf.
I mixed brown acrylic paint with a lot of water and use an old stiff brush to apply the mix. I used a soft brush to move the mix around.
If you get too much dirty wash on your shelf or you don't like what you did just spritz water on it before the mix dries and wipe the mix off.
You can start again.
Back to the bird houses.
Paint the perch for your birdhouses and cut three pieces.
Glue the perches into the 1/16" diameter holes.
Glue the roofs on.
I put a 3/16" dowel on my roof, then tied the bow.
This helps make the hanging loops all the same size.
There they are all hanging in a row!
I heard from several of you about last month's tutorial, you all loved it! I am so glad you found it just as wonderful as I did. Great big thank you to Tina for doing that for us.
I will be kit bashing the Queen Anne Wing Chair kit for September. This is the chair that I made "Lottie's" chair from. I will be showing how to make it look sat in and aged. I will also show you how to steam an afghan in place.
TTUL, Kris
Have fun, Expand on it, Make it better . . .
Just Keep Making Minis!!


