

Roberta mentioned that she was making a suitcase; that inspired me to make a tutorial on this set of luggage. I love this era. I've wanted to make a Route 66 motel room, maybe with newlyweds, chenille bedspread and so on. I don't think I'll ever get to but here's their luggage!

Here's the inside of the little train case. I don't show making this but the assembly is the same as the suit case. I made the train case first to see if I could make it this small. Yes, the hands did wobble but I did it.
I used shiny paper for the mirror.

I am using yellow carpenter's glue for most of this tutorial.
Print out Nancy's patterns onto card stock.
The sides have to be traced onto heavy weight poster board, I buy this from Michaels.
Trace four of the bottom's sides and cut out.

Here are Nancy's patterns. Use the "How to Re-Size the patterns" from the "Things to do, Things to see" list. Print them onto card stock. Print them again onto paper. Use glue stick to glue the paper patterns to the luggage sides, and liner sides. Gluing the paper on shouldn't change the measurements.
Thank you, Nancy.

Glue one side on top of the other, now you have two sides.

The sides for the top of the suitcase are traced on heavy weight poster board, too. Cut them out.

Glue as you did with the bottom's sides.

1 3/4 inches is the width.
The body of the suitcase measures: bottom: 1 3/4" x 2"
Top: 1 3/4" x 1 1/2"
1" is the width for the train case.
The body of the train case measures:
bottom: 1" x 1 1/2"
top: 1" x 1"

Roll the front and back edge over a pencil to make gluing easier.
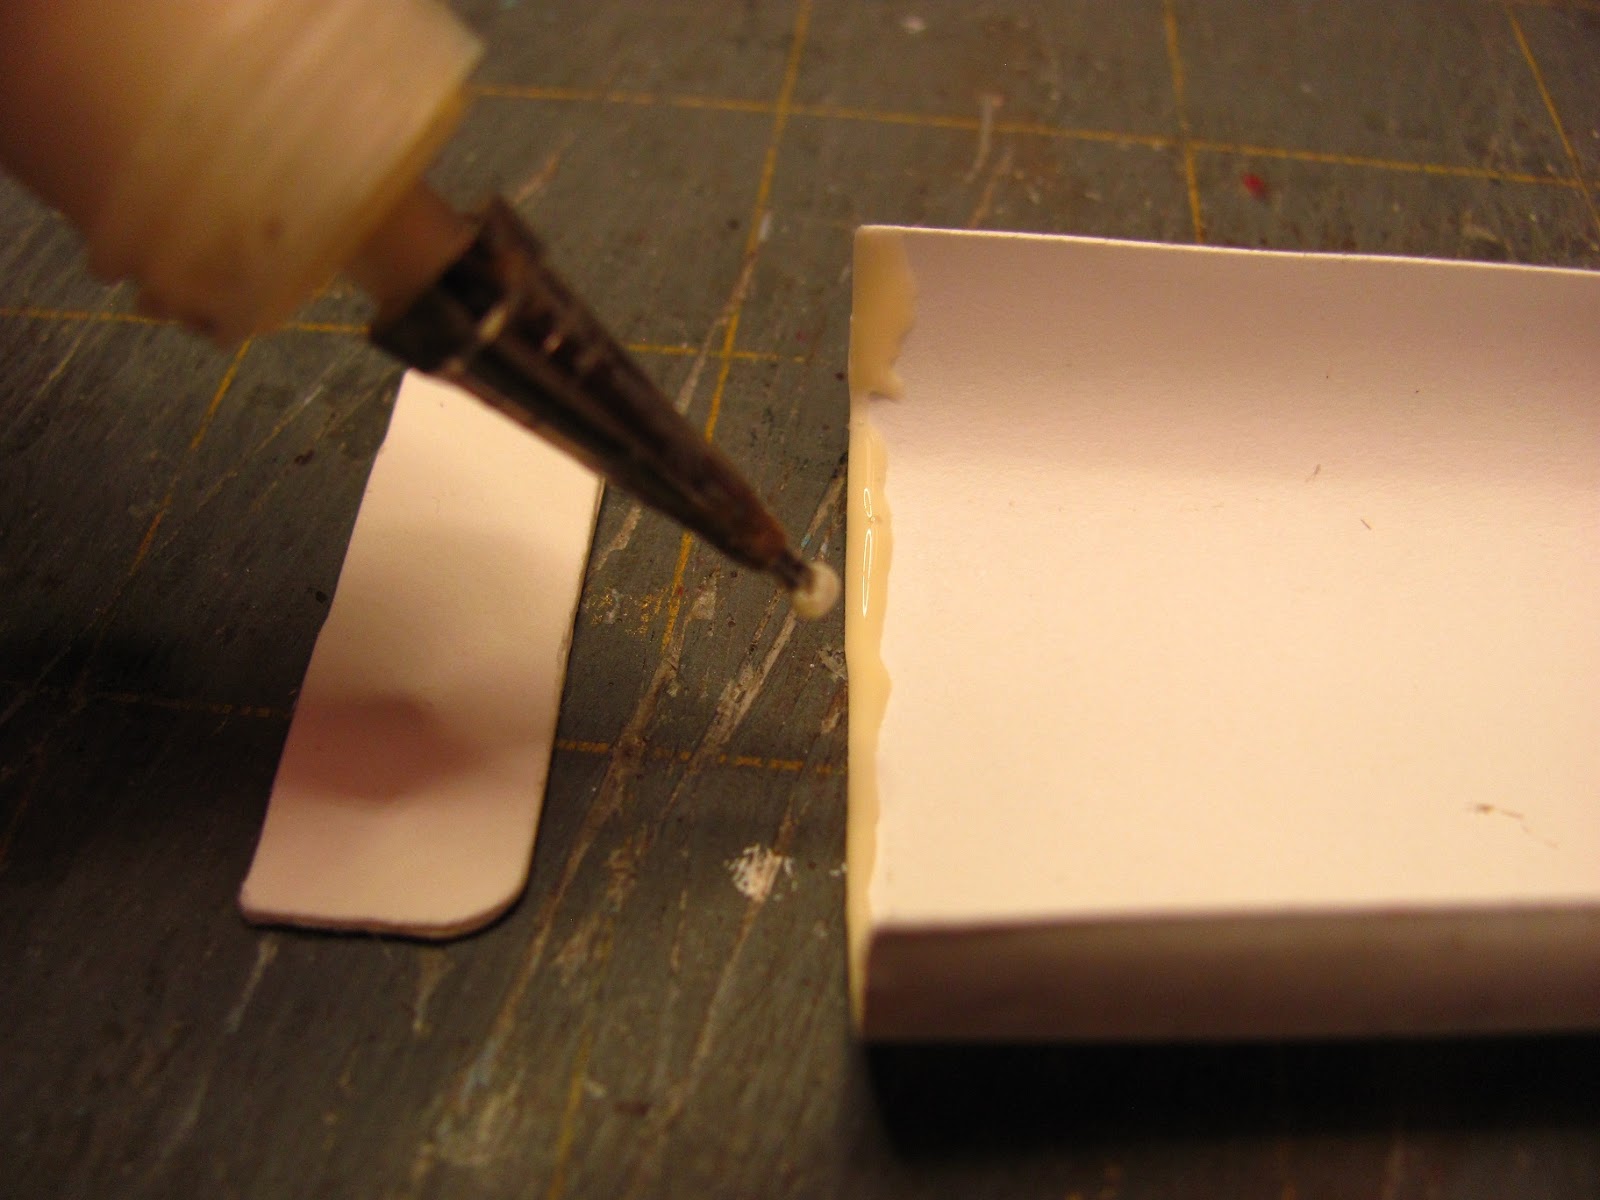
Apply glue to the edge of the card stock.

Glue the sides to the bodies.
Let this dry, please.

I am using a textured piece of wallpaper for my covering. I dabbed on a bit of brown acrylic craft paint to darken it.
I have a Sherwin-Williams paint store near and they give away the wallpaper books. You have to put your name on a list at my store and they call you when they have one to give away. I like the kitchen and bath books the best.

You can see the texture here.
You could use scrap book paper or even fabric. I would coat the fabric afterwards with Modge Podge.

Cut out a piece and use the YCG to glue it to the body.

I know the card stock seems too thin but after a day or two the glue cures and your suitcase is very sturdy.

Trim off the sides.

Trim off a little bit for the doubled poster board ends.

Run your tweezers close to the edge of the body to score the paper, it will make it easier to fold the paper over to the inside.

Glue the extra paper to the inside of the bottom.

Cover the top the same way.

Apply glue to the sides and press the paper onto the sides.

Trim the extra to match the curve and score.

Press the paper into the glue.
Cover the sides of the top just like this.

From some contrast paper I measured a 1/8" strip.

I cut the strips out.

Before gluing the contrast strips on I marked a center line.

I used this center line as a guide for gluing.
I used tacky glue to glue the wallpaper to wallpaper. It was vinyl and I thought that would be best.

This is a good place to stop for awhile and let everything dry. I left my suitcase dry overnight.

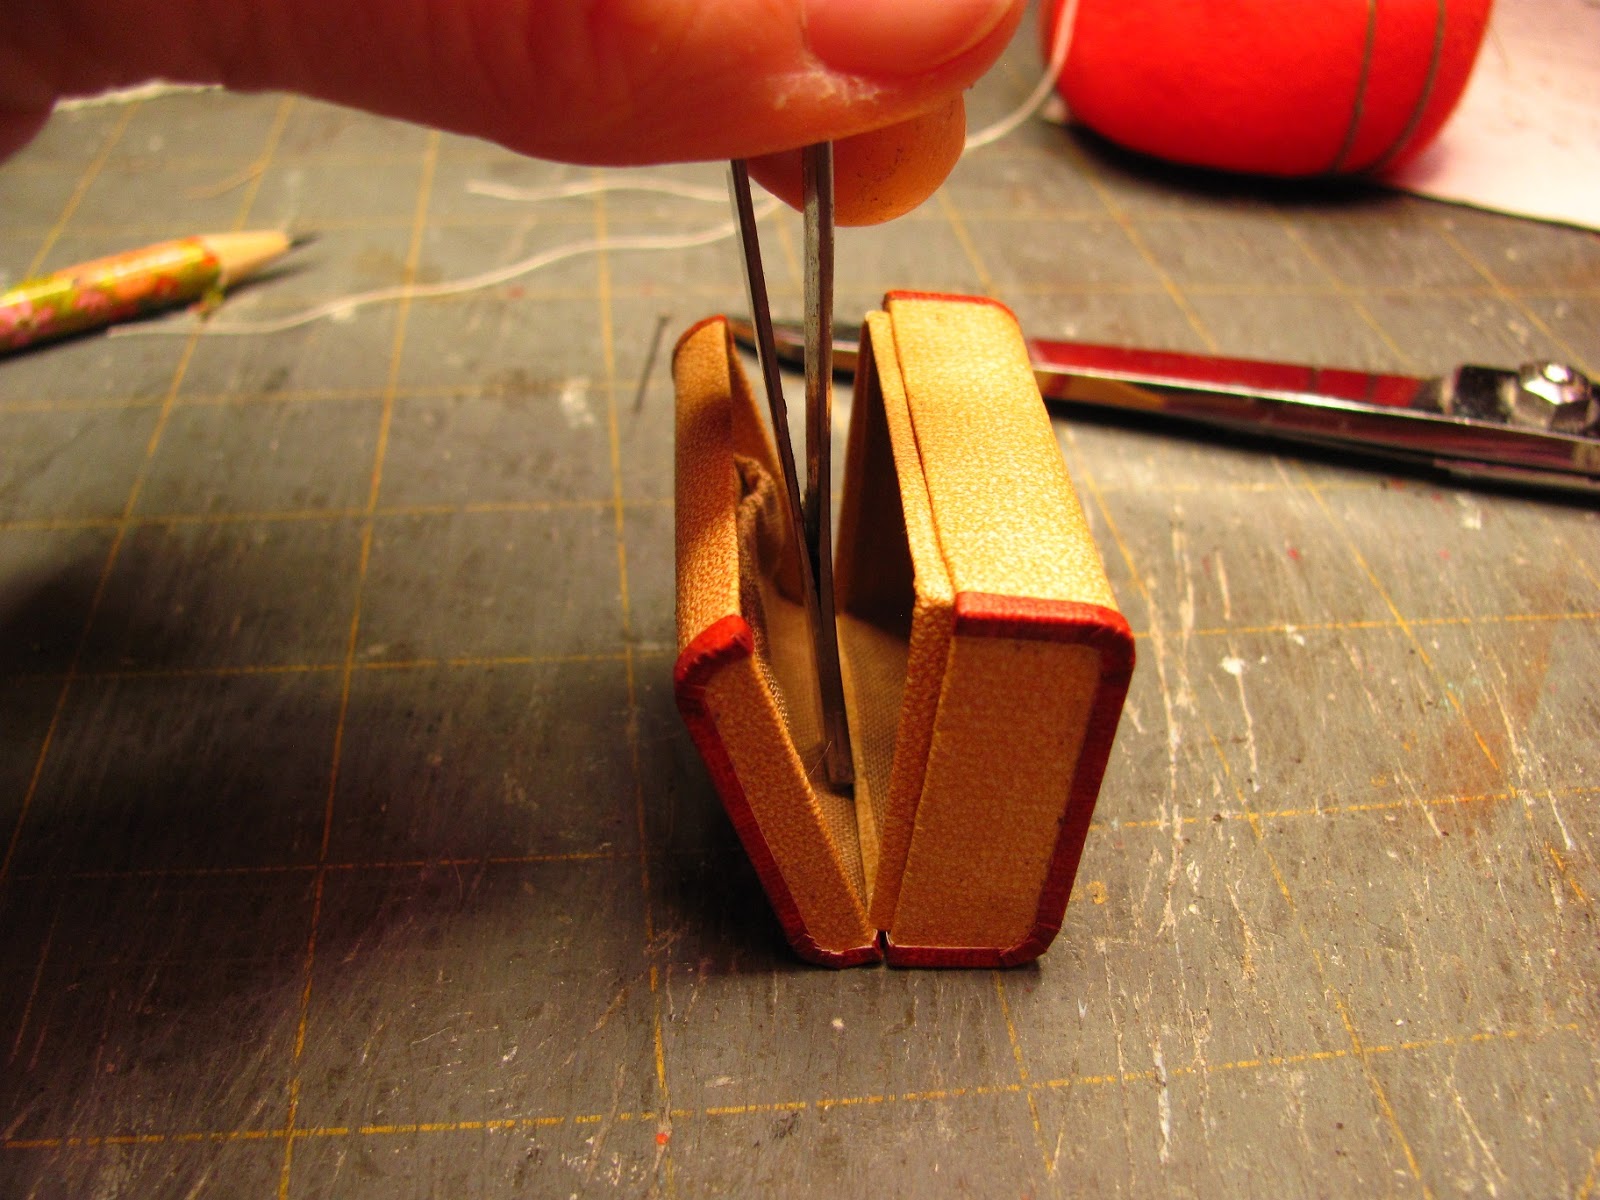
Clip the curves.

Again, I used tacky glue to glue the trim to the sides.

The curves are glued and I've trimmed the contrast off the sides and shortened the strip that is on the body. Fold and glue that little piece onto the top of the sides.
On the left is the finished bit.

Cut a strip of your covering and glue to the back of the bottom of the suitcase. This is your hinge.

This is the liner, it is only for the bottom of the suitcase and the bottom of the train case.
The body of the liner is card stock and the sides are one layer of heavy weight poster board.
Fold the ends of the body over a pencil to make it easier for gluing.

Use YCG to glue this together.
1 5/8" is the width of the liner body. The liner body of the suitcase measures: 1 5/8" x 2"
The sides are glued.
The width of the liner body of the train case measures: 7/8"
The liner body of the train case measures: 7/8" x 1 5/8".

Dry fitting. You should have a little space around the lining for a cover.

Cutting a strip of wallpaper 3/4" wide.

Score down the middle of the strip.
Start at the middle of one of the sides and use YCG to glue the strip onto the liner.

Clip the corners and fold the cover to the inside and glue down.

Glue the liner into the bottom of the suitcase.

Just a trial fit, don't glue the top on, yet.

We use 3 handles to make the handle.
Look at the way they are positioned on my table, the narrow part of the handle is on the sides.

Cut off the middle of two of the handles. Glue with YCG these pieces onto the whole handle.

Fold and glue the handle together.
Insert a "T" pin through the channel that was created when you trimmed the other handles.

To cover the layers apply YCG to the outside edge of the handle. You will have to apply the glue 2 to 3 times to cover the layers.

Now, for the locks.
I wanted Nancy to draw these for you because the punch that I used is probably not available anymore.
You have 4 half circles, 2 large teardrops and 2 smaller teardrops.
Of course, you can use something else that you like for the locks.

Use YCG to glue two half circles to the other half circles. Glue the small teardrop onto the large teardrop.

I painted my locks gold.

I mixed some paint to match my trim and painted the handle and touched up the trim on the suitcase. The wallpaper backing shows at the cuts I made.

To save my mixed color I put a small lid over it. This is the second batch of mixed paint. Tigger thought that the red lid would be fun to knock around the table and preceded to get her foot full of paint. Add a weight on top of your lid if you have visitors to your work table. Just a suggestion. . . .

While the paint is drying and waiting for more coats you can put together the inner lining for the suitcase.
Cut a strip of fabric, finger press a tiny hem and glue down with tacky glue.

Start this lining on the inside front of the suitcase, that way you won't see the seam.

The lining is in.

Measure and cut a piece of card stock for the bottom.

Trial fit.

Apply glue stick to the card stock and press onto the fabric.

Trim the corners and use tacky glue to the glue the extra to the wrong side.

Glue the bottom into the suitcase.

I want to show you how I added a little shape to the top of the locks.
I added yellow carpenter's glue to the top of the teardrop. Let this dry and you may add some more if you like.

I am showing this picture of the lining for the top of the suitcase because you can see how much space is left at the top and bottom of the lining.
You have the liner, that lip on the bottom of the suitcase. You have to leave room for that to slip up into the top of the suitcase.
Remember that when you are measuring and cutting the card stock for this piece.

After you have measured and made a dry fit for size, cover the card stock that is for the top of the suitcase lining.
Clip the corners and glue the extra to the wrong side.

This is my try at the little pocket that suitcases have in the top.

Cut the shape out. Glue up the bottom hem.
Finger press the top hem.
Apply the tacky glue to the very edge of the fabric. We are making a channel.

Thread a needle and run the needle though the channel to gather the top edge of the pocket.

Glue the bottom edge to the lining.

Glue one side to the back of the lining.

Pull the thread to gather and secure.
Glue the other side to the back of the lining.

Apply glue to the inside top of the suitcase.
Notice I haven't put any glue at the back, what I call the back.
That's were you will insert the hinge paper.

Glue the lining in.
Pull the lining away from the back of the top of the suitcase a bit.
Slide the hinge paper into the top of the suitcase under the lining.
Press down with something, I used the bottom of my tweezers. Hold, let dry.

This is what you should have.

I used a 3/16" punch to punch some circles from card stock.
Cut the circles in half.

You need 4 half circles, single layer.
Cut a 1/16" strip of card stock.
Paint everything gold.
I've added glue to the tops of my teardrop locks and painted them gold again.

Cut the strip in half.
Glue one end under a half circle.
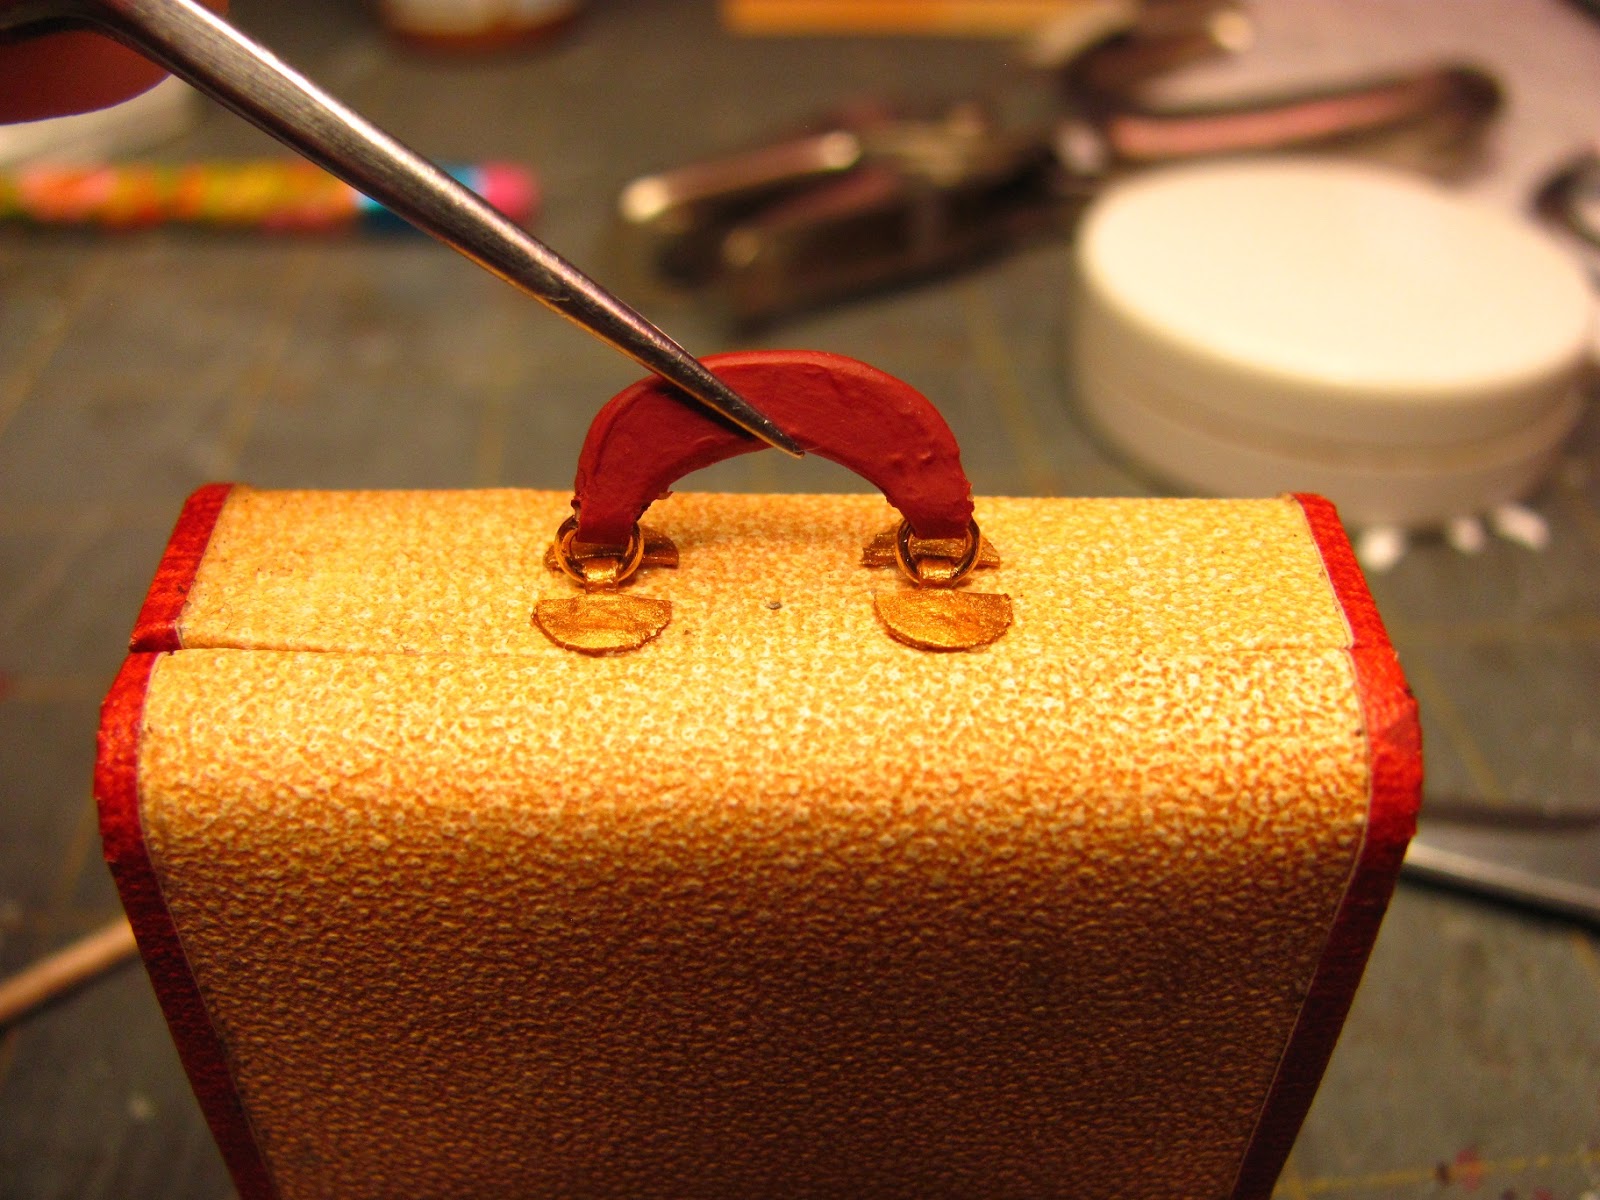
These are jump rings, tiny jump rings. The outside measurement is 1/8", the inside measurement is 1/16".

This is how the handle is attached.

To open a jump ring you have to use two needle nose pliers to hold on to it. Then just move the ends so they by pass each other.
Don't spread the ring apart.

Slip the rings into the handle.
Press the rings back together.

Measure and find the center where you want your handle.
Glue, I'm using tacky, the half circles to the front of the suitcase.
This is a good time to walk away . . . give the glue time to dry.

You're back.
Fold the strip down and crease with your tweezers, trim off the strip. Leave enough to glue under the half circle.

Glue the strip down, then glue the half circle onto the suitcase and strip.
The handle is on.

The locks are glued on.

Finished.

All ready for a little trip along Route 66!
I know this might be a bit fiddly but aren't they cute. You could use these in an attic, antique shop or yard sale scene, too.
If you have any questions or would like to send pictures for the Follower's Gallery please send to
camceiling@frontiernet.net
Have fun, Expand on it, Make it better . . . . .
Just Keep Making Minis!
TTUL Kris