Last month was kind of busy. My husband and I had to go out of town a couple of times. I didn't take care of my table and the cats AND bunny got to the bar stools I made for last month's tutorial.
Totally my fault, I didn't put them away. I kept finding the chair part all over the house, that's Tigger. For a few days I couldn't find it all, that's when Ginger, the bunny had it. Then Digger got to both sets of legs.
I am remaking 1 bar stool to take pictures with the finished bar. And I promise to put my things away, MOM!
I found the most wonderful chair at a flea market the other day and my wonderful husband bought it for me. I am going to make it in miniature and sell it on the CDHM site when I get time to make the pattern.
It's just so cool! It swivels, too.
On to this month's tutorial, the bar to go with last month's bar stools.
I made it to match the one in the Sears catalog.
The patterns for the bar will be at the end of the tutorial. Big thanks to Nancy for making them for us, again.
Use the directions found on the left of the blog in the "Things to do, Things to see" list, HOW TO RE-SIZE THE PATTERNS.
Use the top and bottom pattern to trace onto mat board twice. One top and one bottom.
Here are my top and bottom cut out.
Use the shelf pattern to cut 5 shelves from mat board.
In the picture I've cut 5 shelves.
I have glued four shelves together, two and two.
So, you have one single shelf and two that are two layers of mat board glued together.
I am showing you the difference between the doubled layer and the single layer shelves.
Use the pattern to mark lines on the top and bottom pieces.
We are going to glue the doubled shelves onto the top and bottom pieces.
I am going to use the tacky glue to glue these together because I want a quick grab.
Line up the sides of the shelves with the lines on the top and bottom. Line up the curved edge of the shelf with the same curved edge of the top or bottom.
I have both of the shelves glued on.
Cu the body of the bar from one layer of mat board.
The measurements are:
6 7/16" long x 2 1/2" high.
Measure in from either side 1 3/16" and draw a line.
Use your ruler and craft knife to cut on the line. DON'T CUT THROUGH the mat board.
Bend the mat board on the lines, now. Not much, just a little for now.
Draw lines on either side of your first lines.
These should be 1/8" on either side of the first lines.
Cut on the new lines, not through.
Bend the mat board on the new lines making rounded corners.
The "shelves" we glued to the top and bottom bar pieces are the framework we are going to glue the body to.
Use the tacky glue to glue the body to the bottom piece.
Glue the top on the body.
You will need to hold things together awhile until the glue tacks up.
Here is the front of the bar.
Cut a card stock cover for the body of the bar.
The measurements are:
6 9/16" x 2 1/2".
Dry fit before applying the glue. Trim if needed.
I used yellow carpenter's glue to glue the card stock on, BUT you can use tacky if you want.
Smear the glue on the side.
Smear more glue onto the front and other side and press the card stock down.
The cover is on.
I am going to make the legs from a 1/4" dowel and a pencil sharpener.
Make a mark 5/8" from the end of the dowel. Mark all around the dowel.
Make a second mark at 3/4", all around the dowel.
Insert the dowel into the pencil sharpener and twist to sharpen.
Twist until you get to the second line.
Remove the dowel.
Use your craft knife to cut the dowel. Roll the knife and dowel on the table. You should get to a point that you can snap the tip of the dowel off. You don't have to cut through.
I've snapped off the leg.
Do the last 7 steps 3 more times.
I have four legs and two toothpicks that I am going to use for dowels.
Use a "T" pin to mark the center of each leg.
Drill holes into the legs.
Cut the tips of the toothpicks off and cut them in half.
Use yellow carpenter's glue in the hole and insert the toothpick in the holes.
Let dry.
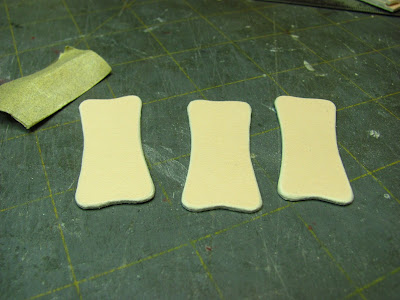
Use the decorative pattern piece to cut 3 from mat board.
Here I've got my 3 pieces of mat board glued along the edges and I am going to cut them out with the scroll saw.
You can cut them individually with your craft knife.
Here they are.
I've used 220 grit sand paper to soften the edges a bit.
I wanted to cover the raw edge of the top and bottom of the bar.
I cut 1/16" wide pieces of card stock to do this. I didn't measure, I just cut really narrow strips. Dry fit to make the pieces don't extend beyond the thickness of the mat board.
I am starting the strip at the back of the bar.
I didn't cut a piece to cover the thicker part of the bar. You could if you wanted to.
That's done.
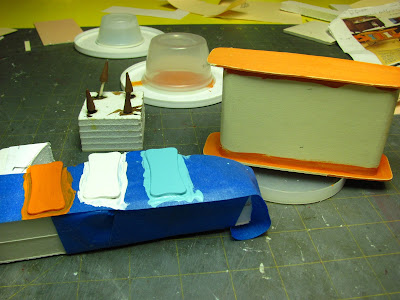
I've painted the legs.
It's faster than staining.
I ended up choosing a darker brown for the final color.
I am painting everything.
I painted at least 2 coats, sanded with 220 grit sand paper and painted again.
Paint and sand until you are satisfied with the surface.
Apply a couple of coats of varnish that is compatible with your paint. I used acrylic craft paint so I used an acrylic craft varnish, Delta.
Just a note here about the white I use. I like Delta's Magnolia white. It looks white but it's not white/white. It's a nice color to have on the shelf.
I want the little metal feet on my wooden legs.
I glued 3 layers of card stock together and punched out circles.
I used 1/16" punch.
Glue these to the bottom of the legs.
I also did this for the legs on the bar stools.
Glue the shelf in now.
For the body of the bar I am using something that the full size original probably used: Contact Paper.
I bought this at Dollar Tree.
Cut this a little longer that the bar and 2 1/2" high. Dry fit to make sure it's not too tight a fit. Trim if you need to.
Peel off the back and apply to the body of the bar.
I am sorry that I didn't take a picture of the contact paper application. I forgot and didn't notice until I was re-sizing the pictures for the blog.
Use the pattern to mark on the bottom of the bar the lines on either end.
The pattern I show above doesn't have all the markings on it. Your pattern has the "X'es" on it.
Line up your pattern on the bottom of the bar like I have.
Use a "T" pin to pierce the pattern on the center of the "X'es".
I have transferred my markings and I am going use the "T" to pierce holes into the bottom of the bar at the center of those "X'es" I made.
I have cut the tooth pick dowels off to about 1/8".
I drilled holes into the bottom of the bar.
I glued the legs into the holes. I used yellow carpenter's glue.
There's the contact paper.
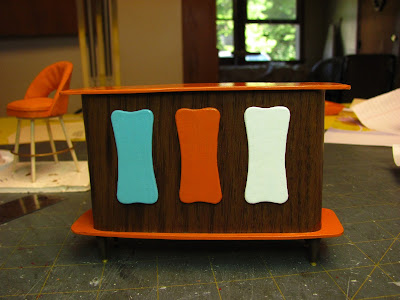
I used tacky glue to glue the decorative pieces to the front.
When I looked at the picture from the catalog I thought the pieces had more space at the bottom than the top, so that's how I glued them on.
Here is the finished bar with a re-made bar stool.
I painted the fabric the same color at the top and bottom of the bar. I also painted the legs the same color as the bar's legs. I sprayed the chair with Krylon varnish, satin. I wish I had gloss, but this will do. I buy the Krylon in the paint department at Wal-Mart.
This was so much fun to make something like this from my teenage years. I hope it sparks something in you also.
Here are the beautiful patterns from Nancy . . . . .
Thanks, Nancy.
Questions and pictures: camceiling@frontiernet.net
Have fun, Expand on it, Make it better . . . .
Just keep making minis!


