
Learn how to make miniature dollhouse furniture, mini paper accessories and get techniques, tips and monthly tutorials.
Tuesday, August 31, 2010
Cooker or Stove
When I was reading the British version of "Country Home" I noticed that stoves were used for heating, so you all call what you cook on a "cooker". Hmmm, sounds logical. You call them "cookers" even if they are the electric or gas turn on/turn off type? We call what we cook on a stove and we can have a stove to heat with, too, but they are not the same thing, confusing. I love reading all about it. I'm a nut on information, not anything useful mind you, just nosy I suppose. Thanks for answering my questions. Now I have another, when I watch the imported British T.V. shows I see small refrigerators, under the counter. Is this typical?
Sunday, August 29, 2010
Soooo Tired


Hi Guys, I am so tired, all I have been doing is sleeping and trying to get e-mails out. Katie walks just about everywhere and very fast, I can't blame her she learned from me. As soon as the kids started walking that's what they did, no carriages or strollers. But now I need a stroller! She keeps in shape with all that walking, I should do more.
I've finished a customized Farm Wing for a miniaturist in England.
Customized, my patterns, your fabric or your choice of fabric.
I also have a Santa chair finished for this Christmas season.
Do you see the rug under the Farm Wing? It's a "cheater" rug using the suede paper from www.dragonflyintl.com. You can't tell it's not a braided rug unless you reach out and touch it.
TTYL Kris
Thursday, August 26, 2010
Katie's Jam

This is some of Katie's Jam, she couldn't wait for the jars to cool until she was busy dolling up the jars. She has the Yo-Yo makers and I think they are so cool. I brought more of my fabric up for her and my box of wider ribbon. I am trying to clean out the things I just won't use anymore, I know she will utilize them.
She is very creative, one day I will have to take pictures of the dolls she used to sculpt, I took a couple up to her, maybe to get her to sculpt again. She is so busy, though.
I have seen the Thorne Rooms, gone twice and I love them. I like them better than the Colleen Moore Castle. I know that the Chicago area has so many shows, it would be fun the arrange a meeting with bloggers that could get to one, wouldn't it!? Will talk to you later, just got in off the train. Kris
Wednesday, August 25, 2010
I'm in Chicago!
I am in Chicago visiting my oldest daughter, Katie. I am on her Apple laptop and loving it. We went to her new Michael's and she took me to her eyeglass place. She wants me to update my look, O.K. I'm an old mom. I love coming up here, I ride the train for about 5 hours. She lives close to Think Small by Rosebud. It's a nice miniature store, and they have a lower level for miniaturists to work on their dollhouses.
We are going to make strawberry jam tomorrow, and then I will ride the train home. I am watching Top Chef and eating Swedish Fish and writing to you all, this is just so much fun.
I was reading her Country Living magazine,(British Edition), it's lovely. I have a question for our English miniaturists . . . .I have researched the Aga range. I think it's neat that it is always on. Are there other ranges like this? Is this called a range or cooker because it is always on? We generally call them stoves, but they turn on and off. Shed a little light on this for me. I suspect the Aga range is expensive.
Joy, I have your settee almost finished, the frame work with the legs needs another coat of finish, I will do that when I get home.
We need to go shopping for strawberries, so I will say talk to you later, Kris
Thursday, August 19, 2010
P.S.S. on Piping Project
I was making piping today and I thought, "Did I say in the directions that piping does not work on all fabrics?" I have added these thoughts at the bottom of the piping project. Piping does not work on all fabrics, you just have to try the fabric out to see if the fabric works. Another thought, sometimes when you are rolling the piping to finish it, try rolling towards you or away from you, which ever is comfortable, to keep the piping from twisting. You can't keep it from twisting. I wish I didn't have to roll it, but after I have pressed it into the glue to seal and then cut it off from the rest of the fabric, the piping can be flat and it has a little edge of fabric left from where the scissors didn't get all of the fabric. As I said, I did add this to the bottom of the project just in case someone runs across it later on. TTYL Kris
Keep checking the Printies Post
Very helpful miniaturists keep adding to the printies post about book pages, keep checking.
Double sided tape sounds nice and clean, with no worries about glue leakage, good idea. I do have to tell myself to keep the glue to a minimum. If you spread the glue out, I have found that the leakage doesn't happen too much. I have a friend that does not like to touch the glue and get the glue on her fingers, she doesn't like the smearing. I always smear the glue around on anything I apply glue to, I waste a lot of glue, I know, because I am wiping it off. I keep a rag for wiping my fingers in my lap and a damp cloth in a bowl on my table. I used to be pretty bad about getting glue all over, but with time I've learned to wipe, wipe and wipe my fingers. I was always told I was a messy child, I don't think I've changed much,LOL! TTYL Kris
Double sided tape sounds nice and clean, with no worries about glue leakage, good idea. I do have to tell myself to keep the glue to a minimum. If you spread the glue out, I have found that the leakage doesn't happen too much. I have a friend that does not like to touch the glue and get the glue on her fingers, she doesn't like the smearing. I always smear the glue around on anything I apply glue to, I waste a lot of glue, I know, because I am wiping it off. I keep a rag for wiping my fingers in my lap and a damp cloth in a bowl on my table. I used to be pretty bad about getting glue all over, but with time I've learned to wipe, wipe and wipe my fingers. I was always told I was a messy child, I don't think I've changed much,LOL! TTYL Kris
Wednesday, August 18, 2010
A Big Thank You to Carol
Thank you so much for the information! It helps a lot and I will refer to it when I want to have an open book. Kris
Printies for Pages of Books??
I don't know where you could get pages of books, maybe someone reading this does know and will share. It's hard to reduce and keep it readable, you have to start small to begin with. I do know something though, my son told me about vector images, they can be re-sized up and down without changing them. I don't know how to make a vector image though. Someone with PhotoShop would probably know. I will check with my son and let you know. TTYL Kris
Stacks of Books Part 2

 Part 2 of Stacks of Books.
Use a steel rule to cut off a book, either from your glued up strip or the strip you cut from the memo pad.
If you are using pre-made books pick one out now.
This may be another fussy step, but I do it. I glue a piece or two of card stock on the spine of the book. This helps in rounding out the spine, keeping it from looking so flat. This can be left out.

Trace around the book, or measure the length and width of the book and make the covers from card stock.
Make a spine for the book, also.
I do not add anything for a lip around the book, the covering will add the little bit you need.


Cut small pieces of the stiffened crochet thread and glue to the spine.


Glue the covers and spine to the covering of your choice.
Do you see the little space I left between the covers and spine, this space is less than a 1/16 of an inch. It's not worth measuring, just leave a little space.
Trim the covering around the book cover. Clip the corners.
Glue the covering to the inside of the covers.
This is where we use the embroidery floss. Glue at the top and bottom of the spine.
Apply glue to the inside of the cover and press the book inside. Force the book back towards the spine, the more you do this the better the book looks, I think. If you left a lip around the front of the cover it would be too much, this pushing of the book into the spine gives you enough lip. It also makes the "tooling" show up more. Make a few and you will get better at shaping the cover over the book.
I've used the fabric in this picture.
I used gold paint to highlight the spine.
The sample books. I cut pictures from the Dover catalog to cover a couple and some of the wrapping paper for one, the other is faux leather.
I think they look pretty good on a book shelf.
TTYL Kris
Stacks of Books Part 1

 I am going to do this project in 2 parts.
You can cover the books with the "leather" from the project before the ottoman or use glossy magazine paper or fabric.
These books can open, but I prefer to use them for setting around or stacking.


 I like Dover Publishers, they still send out catalogs! This is a page from the stationery catalog showing wrapping paper. These small bits make good book covers.

When I use fabric I like to brush on some Modge Podge, let it dry. I like the finish it leaves.
You can try out different methods of your own.


For the books we can use pre-made books or the glued end of a small pad of paper, sometimes called a jotter or memo pad.
If you are going to use the memo pad, use a steel rule to cut the glued end off at 1/2 inch or 9/16 inch.
If you are going to make your own stack of paper here is how I do it.
Take a stack of paper, the thickness you want and clip the ends together.
Apply Elmer's glue to the long edge.
While the glue dries put clips on the long edge.
For decorating the spine with the raised tooling stiffen some crochet thread with Elmer's glue. Let dry.
The stiffened crochet thread.
This may be a fussy thing to do, but I will tell you about it anyway. At the top and bottom of the spine of the book there is fabric sticking out, it's usually gold colored. We are going to imitate this with embroidery floss. Separate the floss to one strand.
I like a striped look, so I tie 2 colors of floss together and then hold onto the knot in one hand and the other ends in my other hand. I begin twisting, rolling the floss between my fingers and thumb, twist until it's tight. Bend the center of the twisted floss around a pencil that is secure and let the floss twist back onto it's self. You can gently hold onto the ends of the floss so it doesn't get away from you. You can do this with a little hand held drill, too.
You should have a tightly twisted rope. This is how I make my trim for the furniture, twisting the floss this way. I usually use one color, but if you want a two color trim, remember to tie the colors together and twist from the knot.
If you don't get this, I will try to take a picture with some help. I just couldn't do it by myself. Let me know if any of you need help.
End of Part One.
Sunday, August 8, 2010
Part Four, "Leather" ottoman

Part Four
Trim the bottom points off, there should be enough glue to hold the edges together.
 Fold the top point down and glue.


Trim the top point off.
What are we going to use to cover all of this up with, boxing.
Measure a corner of the cushion, see the corner on the right hand side of the picture, this would be a good corner to measure. Measure top to bottom of the corner. Mine measured 5/16 inch.
Cut the fabric that width and long enough to go around the cushion plus a little extra to fold under both ends where they meet.
We do not turn the raw edges under on the long sides, this will be covered by trim or piping.
Glue the boxing on using the tacky glue, smear it before you press the boxing into place. You want a smooth surface, I hadn't smeared the glue yet when I took the picture.
Make sure all the edges of the boxing are glued down and smooth.
Glue the cushion to the top of the base.
Make piping according to a previous blog project.
Glue the piping on at the edge of the boxing on the top of the cushion and in the seam where the cushion meets the base.
Finished ottoman.
I used Tulip Dimensional Fabric Paint Metallics Gold for making the "nail heads" around the bottom. You can also use Classics #CLA 05558 for real nails.
This ottoman has the round beads for feet.
You could make this in other fabrics to match the furniture you have.
TTYL Kris
Part Three, "Leather" ottoman

 On to Part Three
Set the ottoman base aside, we are making the cushion now.
I use Thermolam Plus for my batting, quilters use this. It's a compact batting.
Cut a 1 5/8 inch by 1 1/4 inch piece of the Thermolam plus and glue it to the top of the cushion. You are leaving about a 1/4" all around, this makes the pouf on the top of the cushion. I use tacky glue for this.

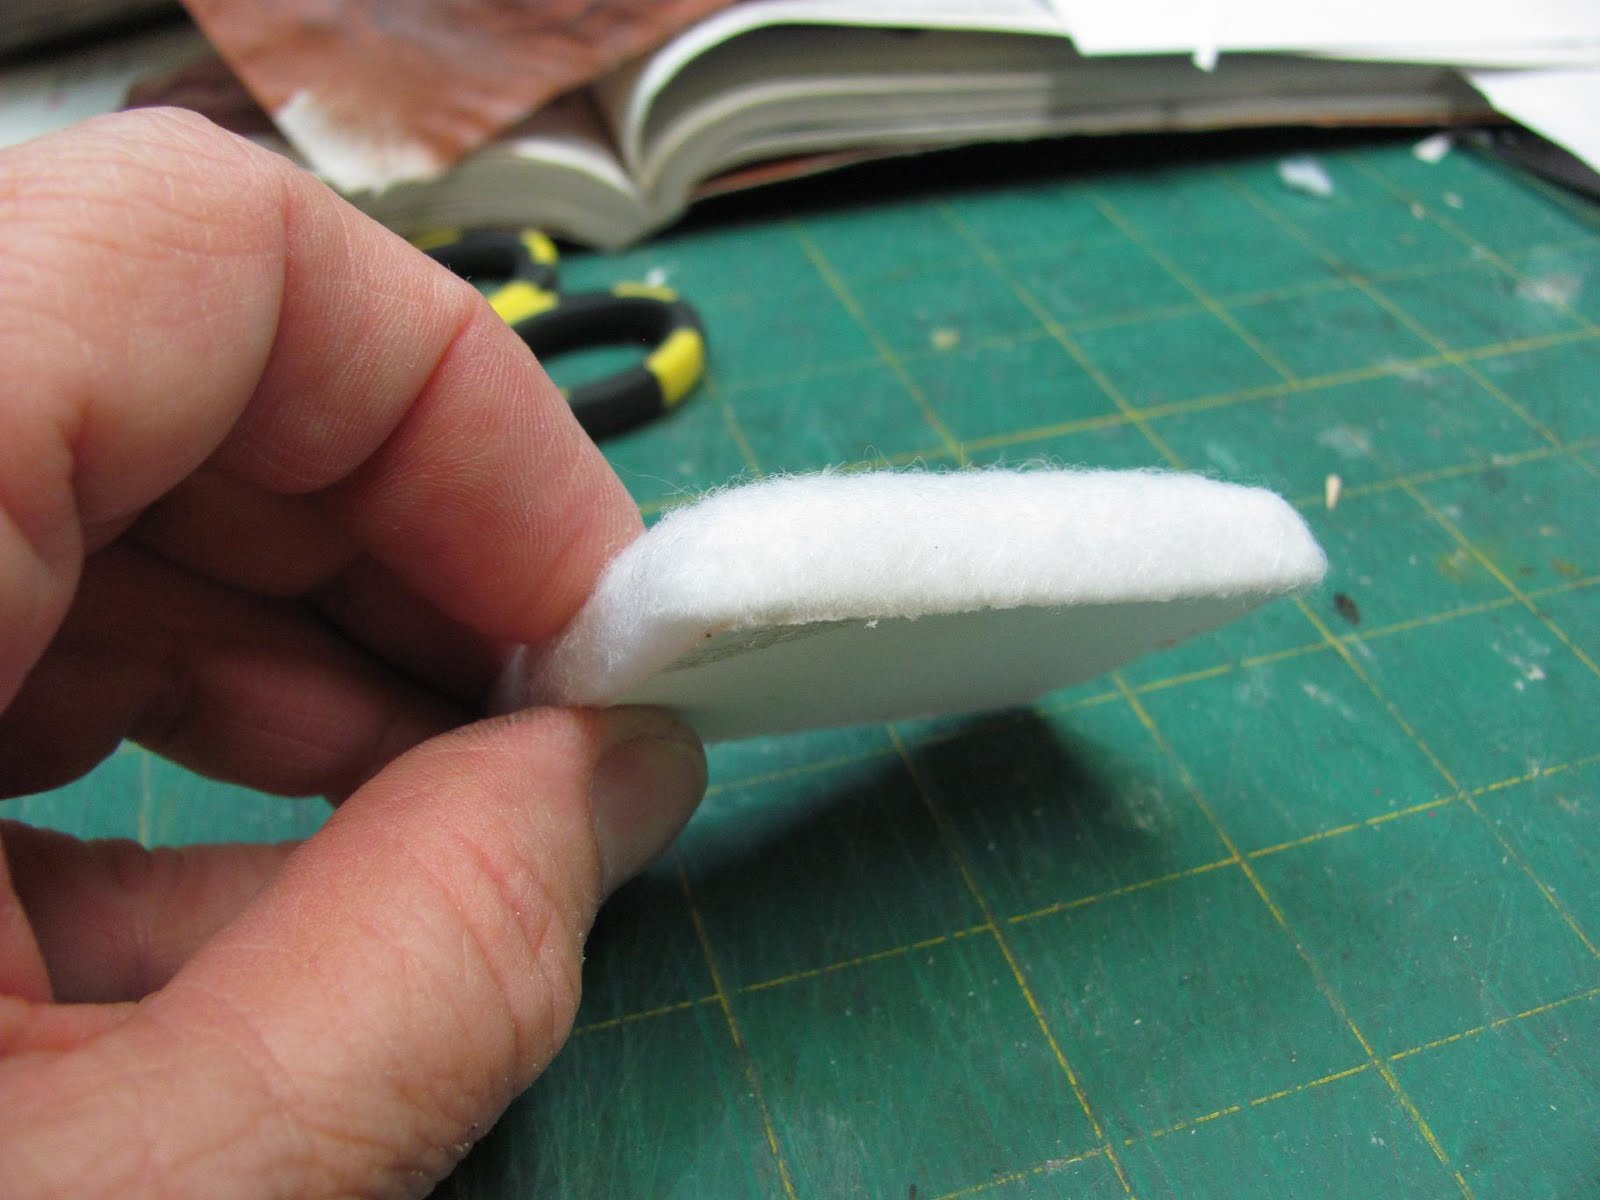


Cut a second piece of Thermolan Plus to go over the top with a little extra to be trimmed later.
Glue the Thermolan Plus down to the foam core sides.
Clip corners.


Trim the Thermolam Plus all around, even with the bottom of the cushion.
Lay the cushion onto the fabric and trim around leaving enough to be folded and glued to the under side of cushion.
Fold and glue the fabric to the bottom on the long sides cushion.
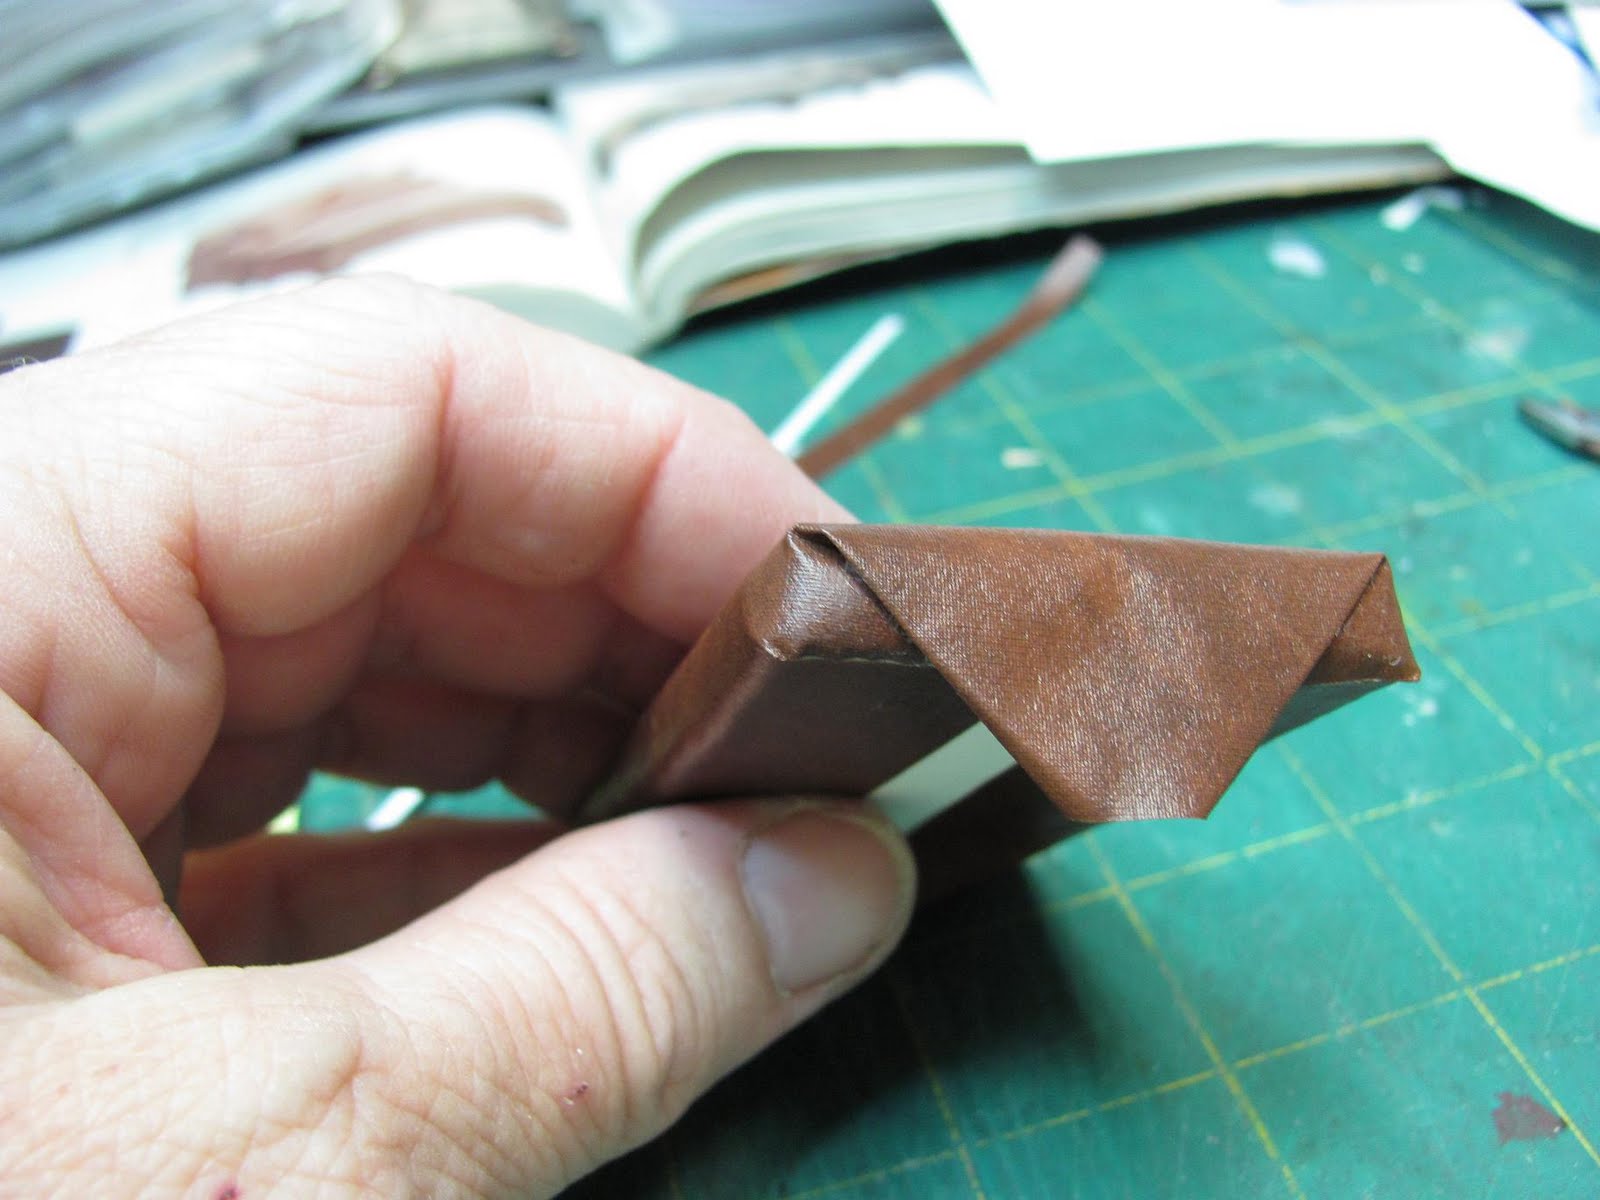
On the short ends, fold in from the sides. You've got 1 point on top and 2 points on the bottom.
Apply glue inside of the bottom points gluing the fabric together.
Do you see the bottom point open ready for glue and the other point is all ready glued together?
Press these points tightly together, close to the form core.
End of Part Three!
Part Two, Ottoman with "leather"

 We are now to Part Two.
I used Aleene's No-Sew to glue the fabric up onto the foam core of the base, but any tacky will do. I use glue stick to glue fabric to the card stock.
Trim off the corners, do you see the little triangles on the table?
Now cut the card stock for the side of the ottoman. This strip is 11/16 inch wide.
This would change if you change the thickness of the fabric. If the fabric is thicker the strip would be thinner. It's all in dry fitting and trial and error. I've made a lot of furniture that ended up in the trash.
Cut the strip long enough to go around the ottoman.

 Dry fit the strip to meet in the mddle at a long side of the ottoman.
Aren't my hands just terrible?


Cut a strip of fabric 1/4" larger all around the card stock strip.
With the "leather" you can use an exacto knife to cut it.
Use glue stick on the card stock to glue the fabric to it.
Clip the corners and glue up using the tacky, 1 long side and the short sides.
Spread the tacky glue onto the sides of the ottoman and glue on the fabric covered card stock.
Be careful not to stretch the strip, you could make it too long, just want the ends to meet.
Clip out the corners and glue the extra fabric down to the top.
End of Part Two!
Subscribe to:
Posts (Atom)